Testing Print Detail Levels
3D printing software such as MakerWare contains a lot of settings to allow you to fine-tune how the printer will create printed objects. One of these important settings is the Layer Height setting.
This setting, as the name suggests, controls the height of each individual printed layer. In MakerWare, there are 3 pre-defined settings for low (0.3mm), standard (0.2 mm), and high (0.1mm) resolutions. Altering this setting has a big effect on the quality of the printed object and also on the amount of time it takes for the printer to print the object.
When printing an object at the low resolution (0.3mm) setting, it will take 50% less time than if you printed the object at the medium resolution (0.2mm). The price of this increase in printing speed is the loss of vertical detail in the printed object.

It may, of course, not matter what the layer height is set to; it all depends on what object you are printing and also whether it actually matters if the object isn't as detailed as it could be. If you are printing simple object shapes, then you can probably get away with printing on the low-resolution setting.
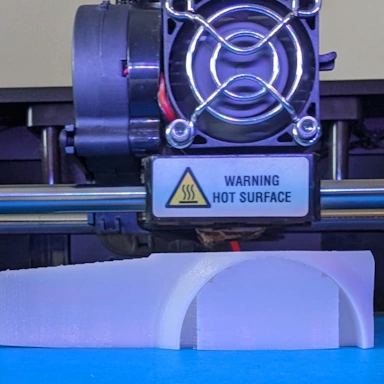
Here, in this test, we shall be printing out a simple shape created in 123D Design. You can also perform this test yourself by downloading the STL file at the bottom of this post. Our shape consists of a cylinder and a sphere joined together. Using a sphere is a perfect test of the different layer settings and will enable us to easily see individual print layers in the finished printed object.
We printed out the object in Low (0.3mm), Medium (0.2mm) and High (0.1mm) resolution and here are the results of our test. Can you spot the difference in the printed objects?

From left to right we have the same object printed with a layer height of 0.3mm, 0.2 mm, and 0.1mm. As can be seen in the low-resolution print on the left, the layers are clearly identifiable, and in the high-resolution print on the right, the layers are much harder to see.
While the high-resolution object looks the best, it also took three times longer to print than the low-resolution object. So while for a fairly small object such as this (10mm x 10mm x 10mm), the print time using a high resolution layer height (0.1mm) was about only 20 minutes, for larger, more complicated objects, the print time will get exponentially higher.
For most of the prints that I do, I tend to use a layer height of 0.2mm. At this height, you get a good level of detail and a much faster print than printing at 0.1mm. Printing at 0.1mm should only be used where having the best detail is essential or you have plenty of time to wait for your print to complete.
If you use Makerware, then using the Preview before printing option is a very good way to see how long an object will take to print (and also the amount of plastic needed).
Happy Printing!
File Download
Click the link below to download the file(s):
Layer Height Test Model: layer-test.zip (408.34kb)
We provide all files as-is, without any kind of warranty, for use in your own personal projects. They may not be redistributed or sold without permission.